
Squarewell™ User Guide
Auto Crop & StraightenContents
- What Squarewell is
- Quick start
- Crop and straighten slides and prints
- Crop film negatives
- Slides and negatives scanned backwards
- Crop album pages into separate photos
- Crop prints with borders or card mounts
- Find and turn sideways photos
- Check every crop before saving, with the app
- Use Squarewell with Mylio and other programs
- Quick commands and keyboard shortcuts
- Settings
- How the crop is found
- The batch check
- Slides whose picture window isn't square
- Irregular shapes
- Labels, keywords and notes
- Requirements
- Undo
- Troubleshooting
- Keyboard and Stream Deck
- Install
- License and free trial
- Updates
- Help
- Appendix: What's new
- Appendix: What's in the folder
- Appendix: License and credits
What Squarewell is
Squarewell finds the slide, print, negative or document in each of your photos and scans, straightens it and crops away the background, whether you shot it on a black background, a white background or a copy stand. It also splits a photo of an album page into one cropped photo for each print on it. It is made for anyone digitizing slides, prints, negatives and albums with a camera or a scanner.
Squarewell comes two ways, with one license for both:
- The Lightroom Classic plug-in: Library > Plug-in Extras > Auto Crop & Straighten...
- The Squarewell app, for Windows and Mac. It doesn't need Lightroom, and it shows you every crop to check before anything is saved.
In Lightroom, Squarewell changes only Lightroom's crop settings, keywords and color labels, never your files, and Edit > Undo takes back a run (once for each 100 photos). The app never changes your originals.
Quick start
- Install: run the Setup program on Windows, or Install Squarewell on a Mac, and choose the plug-in, the app or both (see Install).
In Lightroom Classic
- In the Library, select a whole slide or negative carrier, roll or session at once.
- Choose Library > Plug-in Extras > Auto Crop & Straighten...
- Choose a Profile (Slides and prints, Film negatives (35mm) or Album pages) and click Crop.
- When the message says it is done, check the crops in the grid. Photos worth a second look have a color label.
Changed your mind? Edit > Undo Squarewell takes back the whole run. A run of more than 100 photos is saved 100 photos at a time, so choose Undo once for each part (they show as Squarewell (1 of 3) and so on).
In the app
- Open Squarewell from the Start menu, or from Applications > ThePictureOrg on a Mac. It opens in your web browser.
- Under Photos, click Change, then Choose a folder….
- Choose what the photos are under File content, then click Find crops.
- Check the crops. Click one to adjust it, or untick it to leave it out.
- Click Save N photos. The cropped pictures go into an Auto Crop folder beside the originals.
Your originals are never changed, so to start again, delete the Auto Crop folder.
Next: Crop and straighten slides and prints, Crop film negatives, Crop album pages into separate photos, Crop prints with borders or card mounts, Find and turn sideways photos, Check every crop before saving, with the app.
Crop and straighten slides and prints
Use this for slides, prints, magazines and documents photographed or scanned one to a photo.
- In the Library module, select the photos (grid or filmstrip). Select a whole slide carrier or session at once: photos from the same carrier are checked against each other (see The batch check). Prints of different sizes can be mixed. If only one photo is selected while a folder is chosen in the Folders panel, Squarewell asks whether you meant the whole folder: All N photos crops every photo in that folder and the folders inside it, Just this one crops the selected photo.
- Choose Library > Plug-in Extras > Auto Crop & Straighten... (also under File > Plug-in Extras). Lightroom lists Squarewell's commands there under a gray heading, tpo: Squarewell™.
- Choose a profile, or check the settings (see Settings), and click Crop.
- A progress bar shows each photo as it is done. Cancel stops after the current photo; the photos already done stay cropped. The small x on the progress bar asks first, so a slip of the mouse doesn't stop a long run: Keep working carries on, Stop now stops.
- At the end a message says how many photos were cropped, how many were flagged for rotation or as irregular shapes, which were skipped, and any that could not be cropped, with the reason. It ends with how long the run took, for example "Took 2 min 14 s". With Leave unsure photos uncropped ticked it also says "N left uncropped because Squarewell wasn't sure of the edges".
What you get: each photo is straightened and cropped to the picture, leaving out the background, the slide mount and, if you like, a print's white border. Each photo that gets a color label, or isn't cropped, keeps the reason in its Squarewell note (see Labels, keywords and notes). To undo, see Undo.
Time: roughly 3 to 4 seconds a photo, one at a time, on a typical PC. A computer with four or more cores looks at two or three photos at once (each takes about 1 GB of memory, so fewer when memory is short), which makes a run about 1.7 times faster on four cores and more on eight. The crops are the same either way. Memory use does not grow with the number of photos, and a few hundred photos a run is comfortable.
Capturing for the best results:
- Shoot or scan on an even black background, a copy stand with a gray or tinted grid board or cutting mat, or a white background such as white card or a flatbed scan with the lid closed. Keep the whole item in the frame, with a little background showing all round. On a grid board, the outer part of the frame must be mostly board. Tape or fingers at the corners are fine, and so are a strip of tape or a ruler running to the edge of the frame beside the print, a ruler lying over the print's edge, and a grid with thicker lines every few squares.
- Capture everything in landscape, as usual. Sideways pictures are flagged afterwards (see Find and turn sideways photos).
- Keep the camera square to the item, or the picture's window becomes a slight trapezoid and a straight crop has to trim a sliver (see Slides whose picture window isn't square). For slides or negatives in a carrier, keep the carrier in the same place on the copy stand, so the photos line up for the batch check.
Crop film negatives
Use this for negative strips photographed in a carrier (such as a Negative Supply carrier). Crop the raw negatives before you invert them (in Negative Lab Pro or by hand): converters judge the color from what's inside the crop, so the film rebate and sprocket holes are best left out.
- Capture each negative with a little clear film showing on the sides you can, as usual: the sprocket holes along one long side, and the gaps to the frames on either side. A side that runs off the capture is fine; it is cut at the capture's edge.
- In the Library, select a whole strip or roll at once, with at least three frames whose edges can be seen.
- Choose Library > Plug-in Extras > Auto Crop & Straighten..., choose the Film negatives (35mm) profile or set File content to Film negatives, and click Crop. If you know the format the film was shot in, choose it under Film format (see Film format and Image format).
- Invert the cropped negatives in your converter as usual.
How it works: on a negative the picture is darker than the clear film base around it (the rebate and the gaps between frames). Squarewell measures the film base right beside the sprocket holes, then finds each edge where the film gets darker than that, in 12 stretches a side. It looks past a neighboring frame that shows at the side of the capture. Stretches that don't line up are left out, and a side that disagrees with the others on the straighten angle is dropped.
Frames whose edge can't be seen: deep shadows are nearly clear on a negative, so an edge running through them can be invisible (dark trees along two sides, say). The sprocket holes are the guide. A camera moves the film exactly 8 holes a frame and holds it at a fixed height, so on one roll every frame sits in the same place relative to the holes. The frames whose edges can be seen give that place and the frame size, and Squarewell uses them for any side it can't find. These are measured in sprocket-hole spacings, so a strip shot partly close up and partly wider still crops right. With fewer than three good frames it uses the 3:2 shape of a 35mm frame (or the film format chosen) from the opposite side, and on the sprocket side it crops just inside the holes. A gap side with nothing to go on is cut at the capture's edge.
Mixed with other photos: a 35mm negative selected along with slides or prints (a row of sprocket holes along a side) is found and cropped as a negative even with File content left at Slides, prints, magazines or documents, using the other negatives in the selection for the frame size.
On a black background: a strip or sheet lying on a black background (a light box with the area round the film masked off), with no sprocket holes to go by, is cropped as a print on black is: to the picture itself, with the film's clear or fogged edge left out, even with Crop off print borders unticked. On white card or a light table, a sheet negative is cropped inside the film's pale clear edge, leaving out a dark fogged band or the next frame's edge beyond it.
White balance from the film base (off unless you tick it, on the Cropping tab in Lightroom, or with XMP sidecars in the app): Squarewell also sets each frame's white balance from the clear film around it, the way you would with the white balance dropper on the film edge, in the same step as the crop. The whole roll then starts out neutral, ready to convert as a group. A frame with no clear film showing takes the white balance of the other frames in the run. It works on raw files only (a JPEG or TIFF keeps its white balance), and not on album pages.
Black-and-white negatives (on unless you untick Black & White for black-and-white negatives): Squarewell recognizes negatives shot on black-and-white film and sets their Treatment to Black & White in the same step as the crop, before you convert them. Old black-and-white film often carries a slight color cast that throws off a converter's color model; with Treatment set to Black & White first, Negative Lab Pro converts them as black and white. They also get the keyword Black & white negative. It looks past the orange or purple tint of the film base, so color film is never set to Black & White; a frame too close to call is left as it is. A negative already converted keeps its colors. In the app it works with XMP sidecars, and a saved JPEG or TIFF of a black-and-white negative is saved in gray.
Negatives you have already cropped: to set just the white balance, select them and choose Library > Plug-in Extras > Set white balance only (negatives). Each one gets its white balance from the clear film around the crop it already has; a frame with no film base showing takes the middle value of the others in the selection. Nothing else changes: no crop, keyword or label. Photos with no crop yet, and negatives already converted, are skipped. Edit > Undo takes it back.
Negatives already converted: when the selection holds negatives already turned into positives (by Negative Lab Pro, or inverted with the tone curve), Squarewell asks first: Crop them too or Skip them. A new crop doesn't change their colors, and their white balance is left as it is. Only if you go back into Negative Lab Pro to adjust a frame's color does it work from the new crop. With Replace crops already made unticked, a converted frame that already has a crop is still left as it is. A Positive Copy made by Negative Lab Pro is an ordinary positive and is cropped like any other. In the app, a converted negative's XMP sidecar takes the new crop and keeps its colors, and the message after saving says how many there were.
Every frame matches the roll: frames from one roll share one size. Once every frame is cropped, each is checked against the frames just before and after it, in file-name order. A crop that is not their size (within about 1.5%) is drawn at their size, on the side of its own that agrees with them, or, in a film carrier, where the frames beside it sit. It gets the yellow label, the keyword Check crop and a note saying what happened, so you only need to look at those frames. To fix one, move the crop; its size is already right. A frame whose picture runs off the edge of the capture is not shrunk to the others' size, and a frame far from their size (another format) is marked and cropped as found. Frames from different rolls side by side don't agree with each other, so nothing is changed there.
Fogged film edges: a negative whose film edge is fogged dark is cropped loosely and straightened. Only the sides with clear film beside the picture can be found, so some of the fogged edge may show. Its Squarewell note says "fogged film edges", so you can find and check these. A frame where nothing can be found with confidence is left uncropped rather than given a steep, wrong straighten angle.
Disc film: a Kodak Disc frame photographed in its holder is found as the picture's rectangle (about 10 x 8 mm) inside the plain band of film round it, leaving out the holder, the frame numbers and the disc's rim. It works with Film negatives or Slides, prints, magazines or documents chosen, and with Disc chosen as the film format the disc frame is looked for first. Disc frames are measured one by one, so they don't need to be selected together.
Not used for negatives: print border trimming, Crop inside rounded or mounted corners, the dark-edge rule at 0 and above on Crop edge, and the rotation flags (the picture is a negative, so the face and sky checks don't work on it). The Crop edge setting still applies.
Limits: Film negatives is made for strips of 35mm captured with a camera in a carrier that shows the sprocket holes. A film format helps with other sizes (120, 4x5), but light-table captures, other film sizes and color slides in strips are still being tested; send samples to The Picture Org.
Slides and negatives scanned backwards
A slide or negative photographed from the wrong side comes out mirrored: writing reads backwards. With Flip slides and negatives scanned backwards ticked (the default, for Film negatives and Slides, prints, magazines or documents), Squarewell reads any writing in each cropped picture, as it is and mirrored (and both upside down). Signs, shop names, logos, captions and dates all count, in English, Spanish, French, German, Italian, Portuguese, Dutch, Swedish and Polish. When the mirrored reading is clearly the real one, the photo is flipped left to right (Lightroom's Photo > Flip Horizontal), gets the keyword Scanned backwards (flipped), and its Squarewell note says what was read. For a negative the picture is read as a positive for the check only; nothing is inverted or saved.
- No writing, no change: most photos have nothing to read, and they are left exactly as they are. Squarewell never guesses from the picture alone.
- Numbers alone don't decide: digits only break a tie, since some date stamps read as other digits when mirrored.
- Already flipped: a photo Lightroom already shows flipped is left as it is, so a second run never flips it back.
- Flipped and sideways: a flipped photo's rotation flag is for the photo as flipped, so Turn right or Turn left is the right way round after the flip (1.6.82). The writing read for the check also tells which way up the photo is (see Find and turn sideways photos).
- Time: reading takes about a second or two a photo (1.6.82: the text lines are found once and read both ways, about half the time of before). Untick the option for a faster run when you know your scans are the right way round.
- In the app: a saved JPEG or TIFF is saved flipped. With XMP sidecars, a camera raw file is flipped by its sidecar; a DNG, JPEG or TIFF gets the keyword and note, and you flip it in Lightroom.
- To undo: Edit > Undo in Lightroom, or Photo > Flip Horizontal again on the photo.
Crop album pages into separate photos
Use this for a photo or scan of an album page (a black or dark page, a light page or grid, a flatbed scan) that holds several prints. Squarewell finds each one and makes it a photo of its own.
- Select the page photos. Album pages can be mixed with ordinary photos and negatives.
- Choose Library > Plug-in Extras > Auto Crop & Straighten..., choose the Album pages profile or set File content to Album pages (several photos on each), and click Crop.
- Check the copies in Grid view.
What you get:
- Each print found becomes a virtual copy of the page, named Photo 1, Photo 2 … in reading order (rows from the top, left to right, as the page is shown in Lightroom, even when the page photo is turned; a page scanned sideways, whose prints mostly need the same quarter turn, is read as it will be once turned), cropped and straightened to that print. The copies sit in that order in the grid, right after the page. The page photo itself is left as it is, so the whole page is still there.
- Also save each photo as a 16-bit TIFF (off at first, on the Album pages tab): each copy is also saved as a TIFF file beside the page, named "page - Photo 1.tif" and so on (ProPhoto RGB, 16-bit, lossless ZIP compression), added to the catalog and stacked with the page, in the same order. Use it when you want each photo as a file of its own.
- Labels and notes: a label or slip of paper on the page, often with a name or date written on it, gets a copy too, named after the photo just above it, or else the one closest to it: Photo 2 note (a second one Photo 2 note 2). It comes right after its photo and is cropped to the whole slip with a small margin, so no writing is cut off. A slip tucked under a print is cropped up to the print's edge, so a sliver of the print may show. A typed slip laid close along a print, with a strip of page between them, gets its own note. Loose scraps of paper are kept as notes. Tape, black photo corners and slivers of the page edge are left out.
- A photo holding just one print (or one print filling most of the frame) is cropped on the photo itself, as it would be without album mode, with no copy made. A photo of a 35mm negative strip is cropped as a negative. The message at the end says how many of each it found.
How prints are found:
- A whole album page on a board: photograph the page lying on a board or backdrop of another color, with a little of the backdrop showing on every side, and Squarewell looks at the page itself for the prints on it: black pages, light or striped magnetic pages, torn pages. A print alone on such a page is cropped to the print. A dark print on a black page found in two or three pieces is put back together as one print, but dark prints on a black page are still sometimes found only in part; check those.
- Prints that touch or overlap are split where one print's edge crosses the other: a step in brightness right across, an outline that jogs where the line meets it, or a white border beside it. A straight line inside one print (a horizon, a fence rail, bricks) is not a split. A pile of overlapping prints gives one copy for each visible strip.
- Black pages with white-bordered prints: on a black page lit unevenly and crowded with white-bordered prints, the borders are not taken for the page, and prints joined by tape and running off the frame are still found.
- Patterned pages: a patterned scrapbook page lying on a board (damask paper, for example) is looked at on its own. Its pattern is learned from the paper along its edge, and each print or card on it with a straight outline all round becomes a copy. Title letters and other cut-outs are left out.
- Magnetic album pages: on a light, self-stick page with a clear film over the prints, faded prints laid close together, or edge to edge, are looked for one by one as straight-sided prints, and told apart by the small notches their rounded corners leave. A print that can't be boxed cleanly still gets a copy, cropped to the box round it, with the Irregular shape note, so nothing on the page is lost. A page where the prints still can't be told apart is left whole.
Borders and writing on album prints:
- With Crop off print borders ticked, every print on a page has its border trimmed on all four sides, even where photo corners or a pale scene hide one side. A patch of handwriting on a border gets a copy of its own, cropped to the writing (Photo 2 note), like a label beside the print. A print with a deckled edge keeps its whole border, and the writing on that border still gets its own copy.
- To keep the writing on the print itself, untick Crop off print borders. The writing still gets its own copy as well. With Crop inside rounded or mounted corners also ticked, a print with handwriting on the strip of border the corners crop would cut off (a caption under the picture, a date in a corner) is kept whole, mounts and rounded corners showing. Its copy gets the blue label.
- Prints Squarewell isn't sure of: with Leave unsure photos uncropped ticked, a print whose edges barely show against the page is left out: no copy is made for it or its label. The page gets the yellow label and a note such as "The print at the top right was not cropped: Squarewell was not sure of its edges (they barely show against the page on 3 sides), so no copy was made for it."
Running again: pages that already have their "Photo" copies are skipped, unless Replace crops already made is ticked. Then the copies are cropped again, and new copies are made only for prints found this time that have none. Edit > Undo takes the crops back; the copies themselves stay (delete them in the Library if needed).
Time: about 3 to 10 seconds a page, more with many prints.
Limits: prints laid edge to edge with no visible line between them, and prints on a page of the same color as their borders, may be taken as one. A heavily fanned stack gives narrow strips.
Crop prints with borders or card mounts
Crop off print borders is on by default: it trims a print's light, even border, on every side that has one, and a studio portrait's card mount, so the crop goes to the picture inside. Untick it to keep a border with handwriting or a printed date on it, or a mount with the photographer's imprint: with it ticked, writing on the border goes with the border.
- Select the prints and choose Library > Plug-in Extras > Auto Crop & Straighten...
- Leave Crop off print borders ticked to trim borders and mounts, or untick it to keep them. Keep deckled edges, just under it, keeps the border of a print with a deckled edge; untick it to trim those too.
- For prints with rounded corners, or held by black photo corners or a mount whose corners overlap the picture, tick Crop inside rounded or mounted corners under Fine-tuning.... Click Crop.
What counts as a border: a light, near-neutral, even band along a side that ends in a clear step into the picture. Each side is checked on its own, so a print with a border on only two sides has just those two trimmed.
- A picture printed a little crooked on its paper, so the border narrows from one end of the side to the other, has the whole border trimmed (to the border's inner edge at its widest). A crease or uneven light across the border doesn't stop it.
- A pale, plain sky or sand at the edge of a borderless print or slide is not taken for a border: a real border ends in a straight line along the side, while sky and sand end wherever the scene does, and a blue sky is never taken for a border.
- A border lost against a light picture: where the picture along one side is as light as the border (a white dress, snow), and the other three sides have a border of much the same width, that side's strip of the same width is trimmed too when it is the border's color all along.
- Wide margins and a border on one side only: a band that is plainly paper (no grain, neutral or cream, ending on a straight line in a clear step into the picture) is trimmed even when it is much wider than the other borders (a wide bottom margin), or when it is the only border left (a print trimmed close on three sides).
- Punched album margins: a print from a ring binder album, with a wide margin punched with holes along one side, loses that margin with its other borders.
- Card mounts: a buff or cream card mount, darker toward its outer edge as it has aged, is trimmed like a border. So are a wide mount (a fifth or more of the print's width on each side) and a plain white or gray mount lit unevenly. A mounted print on a copy stand's light board is found even with tape, a clip or a patch of glare touching it. The picture must be less warm in color than the card: a sepia picture in a sepia mount keeps its mount.
- Documents keep their border: an award, certificate, invitation or printed card, light paper that is mostly blank with thin lines of text on it, keeps its border even with Crop off print borders ticked; a small seal or picture on it doesn't change that. A photo with large areas of tone (a pale snow scene included) still has its border trimmed. A signed card with a photo printed on it is kept whole.
- Deckled edges keep their border: a print with a deckled edge (cut in a run of small, even scallops, as many prints from the 1930s to the 1960s were) keeps its whole border even with Crop off print borders ticked. The crop goes out to the tips of the scallops, so the background shows between them and the print keeps its deckled look. This works for single prints and for prints on album pages, the note on the photo says "deckled edge", and it gets the keyword Deckled edge (1.6.57). A print with a straight-cut or rounded edge is trimmed as before. With Crop off print borders unticked, a deckled print is cropped out to its tips the same way (1.6.80). To trim deckled prints like any other, untick Keep deckled edges (just under Crop off print borders).
- Prints bigger than the frame: with Crop off print borders unticked, a print whose light border runs off the frame and meets the board along a side keeps its border out to the frame and to the board's edge. A border that fills the whole frame on every side can't be told from white card, so leave a strip of board showing along one side.
Crop inside rounded or mounted corners moves each side in just far enough that no corner shows (at most 15% of the short side). It finds black photo corners on a black album page even where they blend into the page. The crop is a little smaller, so leave it off for square-cornered items. A print with a corner cut away far more than that (a school photo cut round at the bottom, say) is treated as an irregular shape instead, so the picture is not cut into (see Irregular shapes).
Find and turn sideways photos
Everything is captured in landscape, so pictures taken in portrait arrive sideways. With Flag photos that look sideways or upside down ticked (the default), Squarewell flags photos that look wrongly turned with the purple label and a keyword under Picture Org. Nothing is rotated:
- Check rotation - turn right (a quarter turn clockwise)
- Check rotation - turn left (a quarter turn counterclockwise)
- Check rotation - upside down
Squarewell goes by the faces, the scene, the horizon and the sky, and by any writing in the picture (1.6.82): a sign, a caption or a shop name that reads clearly one way settles which way up the photo is, even when the sky or a wall suggests otherwise. The writing is read when a photo is about to be flagged or nothing else was sure of it. With Flip slides and negatives scanned backwards ticked, the writing read for that check is used for the rotation too, so it costs no extra time.
To check photos you have already cropped, choose Library > Plug-in Extras > Check rotation only. It checks whether each selected photo looks sideways or upside down, and nothing else: no crop, straighten angle or rotation is changed, so cropped photos are checked as cropped. It starts at once, with no dialog, and gives the same keywords and purple label; photos that look the right way up lose them. Edit > Undo takes the run back.
To turn the flagged photos:
- Show them: in the Library filter bar choose Text > Keywords > contains > Check rotation, or click the keyword in the Keyword List.
- Select them and choose Library > Plug-in Extras > Turn the flagged photos, and confirm. Each one is turned the way its keyword says with Lightroom's own Rotate Left or Rotate Right, so any crop turns with it, and its keyword and purple label come off. Photos without the keyword are left alone.
- Or turn a photo by hand with Ctrl+] or Ctrl+[ (Cmd on a Mac), then remove its keyword.
Nothing in the file changes, and Edit > Undo turns the photos back (once for each photo). As a safeguard against an old Lightroom bug that turned every photo in a filtered grid, the first turn is checked: if any other photo turned with it, it stops and tells you to use Undo. The keywords are never included in exported files. In the app, the Check rotation only button does the same (see Check every crop before saving, with the app).
How it decides:
- Faces first: two or more faces upright in only one turn, found at three different sizes of the picture, so a faint pattern that only looks like a face at one size is ignored. A second face finder (a small model from MediaPipe) finds faces in black-and-white prints, in profile and partly hidden. A face it is fairly sure of one way only, at three sizes, and clearly surer than the right way up, flags the photo; a face it is sure of the right way up means no flag. A face the older finder sees only turned one way also flags the photo when the newer one is fairly sure of a face that same way.
- The scene check: without faces to go by, a small picture model trained to tell which way up whole scenes go (buildings, people at a distance, trees and sky, food on a plate) looks at the picture at all four turns. A quarter turn it is fairly sure of flags the photo; upside down only when it is all but certain. When it thinks the picture is right as it is, the sky and horizon checks are not used. It also overrules the newer face finder when it is sure of a different turn (painted faces in a mural). A quarter turn it is only fairly sure of also flags the photo when the newer face finder is fairly sure of a face that same way, the older finder saw no face, and neither leans the opposite way.
- Sky and horizon, when the scene check isn't sure: a horizon running top to bottom with the light side as the sky (only when the light side is the smoother one, so a textured light wall beside a dark doorway is not a sky), a bright, plain sky along one side edge, or a clearly blue, smooth sky down one side. A single face found only sideways (a profile, a face in sunglasses) doesn't stop the sky check, as long as both point the same way. Sky and horizon only ever suggest a quarter turn, never upside down.
Limits: it is a guess, tuned to avoid false flags, so it misses some: scenes with no people, sky or horizon (a ferry from above), a print of a standing figure whose face it can't find, magazines and documents. The direction is relative to how the photo is shown in Lightroom when Squarewell runs. If you turn a photo in Lightroom afterwards, remove its keyword by hand, or run Check rotation only again.
A photo checked before isn't checked again. Squarewell remembers each rotation answer on this computer. When the same photo, unchanged and cropped the same way, comes up again (in Auto Crop or Check rotation only, even after the file was moved or renamed), it uses that answer instead of checking again, so a second run is quicker. The crop is remembered too: a photo run again with the same settings is not measured again. The answer is always the one the check would give. The end-of-run message says how many were checked earlier and how many now. To check every photo again, tick Check rotation again from scratch (in the app: More options). After an update that changes the check, every photo is checked afresh.
Check every crop before saving, with the app
The app does what the plug-in does, without Lightroom, and lets you see every crop before anything is saved. It runs on your computer only: it is a small program that shows its window as a page in your web browser (the address starts with http://127.0.0.1, which means "this computer"). Nothing is uploaded; the page only talks to the program on your computer.
Starting it: on Windows, Start > Squarewell (or the desktop shortcut). On a Mac, Applications > ThePictureOrg > Squarewell. Your browser opens on the app's page; opening it again while it runs just shows the same page. The gear at the top right is the app's menu: License…, Check for updates, User Guide, Other -well tools, Restore the starter profiles…, Check my setup…, Create an error log… and Quit Squarewell. The ? opens this guide, and the trial or license line opens the license panel. The app also closes by itself a few minutes after you close its browser tab, but never in the middle of finding or saving. While it is finding or saving, Quit Squarewell and closing its browser tab ask first: Keep working lets it finish, Quit anyway stops after the current photo (what is done stays done). Minimizing the window never asks.
The app is one screen: the choices on the left, the results in the middle, and saving along the bottom.
1. Photos (left). Click Change, then Choose a folder… (tick Include subfolders to take the folders inside it too) or Choose photos… for some files. You can also paste a folder's path into the box and click Use. On Windows the folder window has an address bar and a Folder box, so you can type or paste a path there; on a Mac, press Cmd-Shift-G in the folder window to type one. The folder's name and the number of photos are shown. The app remembers the last folder you used, even after it is closed: it shows Last time: with that folder and an Open again button, and the folder windows open there. JPEG, HEIC (iPhone photos), TIFF, PNG, DNG and camera raw files are used. A folder named "Auto Crop" (the app's own results) is skipped.
Profile (left). Under Photos is the Profile list, with Save, Save as…, Rename… and Delete. The profiles are the same ones as in the plug-in (see Profiles): choosing one fills in the settings below, and "(changed)" shows beside Profile after you change one, until you save it.
2. File content, and Crop (left). Choose Negatives (see Crop film negatives), Slides, prints (slides, prints, magazines or documents) or Albums (album pages, which may be mixed with single prints). For negatives and slides, Film format (Image format for slides and prints) works as in the plug-in (see Film format and Image format); with Custom ratio, type the long side over the short (1.5 or 3:2). Then the common options: Crop off print borders and Flag sideways photos. More options holds the crop edge (a box and a slider), crop inside corners and Leave unsure photos uncropped. They work as in the plug-in (see Settings); point at one for a short explanation. Then click Find crops (afterwards, Find crops again). A bar shows the progress; Cancel stops and keeps the photos done so far. When it's done, the message says how long it took.
Check rotation only: the button under Find crops only checks whether each photo looks sideways or upside down. Nothing is cropped: each card shows the whole photo, turned the way Squarewell suggests, and only the photos to turn are ticked. Open a card to change the turn (None, Right, Upside down or Left). Save then makes new pictures turned the right way up (whole, not cropped), or with XMP sidecar writes only the purple label and the "Check rotation" keyword, keeping any crop the sidecar already has. For a camera raw file the sidecar can also turn the photo itself (Turn camera raw files the right way up in their sidecars, on by default; not for DNG files): Lightroom, Bridge and Camera Raw then show it the right way up after Read Metadata from Files, and its "Check rotation" keyword and purple label come off.
3. Check the crops. Every crop is shown as a card with the cropped result. A colored tag at the top right is the same flag as in Lightroom: purple "Turn left?", "Turn right?" or "Upside down?" (nothing is turned); blue "Kept whole", an album print kept whole for the writing on its border; green "Odd shape", an irregular shape cropped to the box around it. A line under each flagged photo says why in plain words, and so does the list of photos not cropped.
- The circle at the top left ticks or unticks a crop for saving. The … menu has Tick all shown and Untick all shown.
- The buttons above show All, Worth a look (the flagged ones), Not saving (unticked) or Adjusted (the ones you changed), each with its count. Before and after shows each photo with its crop outlined beside the result; on album pages the page's other crops are dashed lines.
- Click a card to open it. The photo fills the middle with its crop outlined, and a strip of all the crops runs along the bottom (a colored dot marks the flagged ones; click one to go to it). Drag a white handle to move that side, or drag inside the crop to move it all. On the right: the result, the flag's message with its reason, Straighten (the slider goes from −5° to +5°; − and + turn 0.1°, or type an angle), Save this crop, and Undo my changes, which puts back Squarewell's crop. The Left and Right arrow keys step through the photos, Space saves or skips this one, and Esc or All photos goes back. A crop moved past the photo's edge is pulled back inside, as Lightroom does.
4. Save (bottom). Save as shows how the crops will be saved; click it to change:
- New cropped pictures (the default): each crop straightened and cut out at full size. Format: Same as the original (JPEG stays JPEG; HEIC becomes JPEG; TIFF, PNG and raw files become 16-bit TIFF), or always JPEG (quality 92 unless you change it; JPEGs are then saved again rather than copied) or always TIFF. With Check rotation only, a JPEG saved as Same as the original with no crop drawn is copied exactly, with only its rotation setting changed, so its quality stays the same. Where: in an Auto Crop folder beside the originals, or in a folder you choose (with Choose…, or by pasting its path into the box under it and clicking Use). Names:
photo.tif; album pagespage - Photo 1.tif,page - Photo 1 note.tifas in Lightroom. A name already there gets a number, unless Replace pictures saved there before is ticked. A JPEG keeps the original's camera data (EXIF, its orientation set to upright, since the new picture is already turned the way the photo is shown) and color profile; a TIFF keeps the color profile. Each new picture also carries its color label in standard XMP fields, which Lightroom, Bridge, Mylio and most photo programs read. The flag keywords ("Check rotation - turn left", "Irregular shape") are written only to XMP sidecars, never into a saved picture, so they can't leave with it. - XMP sidecar beside each original: the crop is written to
photo.xmpnext to the photo, in Camera Raw's own crop fields, with the color label and keywords (filed under Picture Org, so Lightroom keeps them under its non-exporting Picture Org keyword). The picture itself is not changed. If a sidecar is already there (say one Lightroom wrote), only these fields are changed and a copy of the old one is kept asphoto.xmp.bak. When two chosen photos share a name (IMG_1.jpgandIMG_1.dng), the JPEG's sidecar isIMG_1.jpg.xmp. Album pages with several prints always get new pictures, since one sidecar holds one crop.
Then click Save N photos (bottom right; it shows how many are ticked). When it's done, Show the files opens the folder and Crop more photos starts again. The originals are never changed or replaced.
Which programs read the sidecar crop: Adobe Camera Raw, Bridge and Lightroom Classic read .xmp sidecars for camera raw files (NEF, CR2, CR3, ARW and so on). In Lightroom, select the photos and choose Metadata > Read Metadata from Files (or import them after the sidecars are written). For DNG, JPEG and TIFF files Adobe's programs read only what is inside the file, not a sidecar, so choose New cropped pictures for those, or use the Lightroom plug-in. The save panel says so when none of the chosen photos is a camera raw file. Other programs vary (see Use Squarewell with Mylio and other programs).
Color of raw files: new pictures made from raw files are converted by the app with the camera's white balance, a plain neutral rendering. For the color you would get from Lightroom or Camera Raw, use the plug-in, or the sidecar way for camera raw files.
Settings (the options, the profile and the save choices) are remembered for next time.
Use Squarewell with Mylio and other programs
The plug-in's crop is Lightroom's own crop setting. After each run, Squarewell has Lightroom save the cropped photos' metadata to their files, as Metadata > Save Metadata to Files does: into an .xmp sidecar beside a raw file, or into the DNG, JPEG or TIFF file itself (the picture itself isn't changed). So another program that writes to the same files, or a later Read Metadata from Files, keeps the crop instead of replacing it with an uncropped one, and other programs can see it.
- On a Mac, macOS asks once to let Lightroom control the computer (System Settings > Privacy & Security > Accessibility); allow it, or the summary asks you to choose Save Metadata to Files yourself, with the photos already selected. The same happens with Lightroom set to a language other than English.
- Album pages: the "Photo" copies are virtual copies, which live only in Lightroom's catalog, so their crops stay there. Export them, or save them as TIFF files beside the page, for other programs.
- Adobe Camera Raw and Photoshop read it. Whether Mylio shows these crops is still to be tested; exporting cropped copies always works.
- The app makes new cropped pictures, which every program shows as they are, or XMP sidecars with the crop in Camera Raw's fields (see Check every crop before saving, with the app). Whether Mylio applies a sidecar's crop is still to be tested; it does read the label in the new pictures.
Quick commands and keyboard shortcuts
Under Library > Plug-in Extras there are also Auto Crop now: slides and prints, Auto Crop now: film negatives and Auto Crop now: album pages. Each one starts at once, with no dialog, with its own kind of photo. It uses the profile chosen for it in File > Plug-in Manager > Profiles, or else the profile last chosen in the dialog (see Profiles); with no profile chosen, it uses the options you last chose in the dialog. The first time you use one, it lists those options and the profile and offers Check settings (opens the dialog), Run now or Cancel; it asks only once.
Give each one a keyboard shortcut to crop a batch in one keystroke:
- Mac: System Settings > Keyboard > Keyboard Shortcuts > App Shortcuts, click +, choose Adobe Lightroom Classic, type the menu title exactly as it appears (for example
Auto Crop now: slides and prints) and press the keys you want. - Windows: Lightroom has no setting for plug-in shortcuts; a macro tool (a keyboard utility, a Stream Deck or similar) can choose the menu item for you.
In the app, every action has a key; press ? to see them. A Stream Deck or other macro pad can run the app's actions and the plug-in's commands in Lightroom: see Keyboard and Stream Deck.
Settings
At the top of the Auto Crop & Straighten... dialog is the Profile row (see Profiles). Below it, the dialog says: "Images of different sizes can be mixed freely. If you group slides or negatives of the same size and type, they can be cropped more accurately, as they can be checked against each other." (see The batch check). Then come File content and Film format (Image format for slides and prints).
Under these the dialog has two tabs: Cropping (print borders, the rotation flag, and replacing crops already made) and Album pages (the TIFF copies, and the Cropping settings again, which apply to album pages too: changing one changes the other). The tab follows File content, and you can still click the other one. Fine-tuning... is a button below the tabs that opens a small window for the crop edge and crop inside corners: OK keeps your changes, Cancel puts them back. A gray line beside it sums up the album and fine-tuning settings, so nothing is hidden. Point at an option for a short explanation.
| Option | Default | What it does |
|---|---|---|
| File content | Slides, prints… | Film negatives for camera captures of negative strips (see Crop film negatives); the border and rotation options are grayed out then. Slides, prints, magazines or documents for one item to a photo. Slides only (1.6.82) for a run of slides: the same, but no photo is taken for a deckled print (Keep deckled edges is grayed out) or for a page of prints, a slide's dark ground (a sunset over dark hills) is kept with the sky, and Image format lists only film formats. Use it for runs of slides. Album pages (several photos on each) for pages holding several prints (see Crop album pages into separate photos). |
| Film format (Image format for slides and prints) | Auto | For negatives and slides (grayed out for album pages). Auto learns a negative's frame size from the strip. Or choose the format the film was shot in, a print size or an instant print, or Custom ratio (see Film format and Image format). |
| Album pages: also save each photo as a 16-bit TIFF | Off | Album pages only: each photo found is also saved as a TIFF file beside the page and stacked with it. |
| Crop off print borders | On | Trims a print's light, even border on every side that has one, and a portrait's card mount, even when there is handwriting or a printed date on it. To keep writing or other notes on a border, untick it so the whole border is kept (see Crop prints with borders or card mounts). |
| Keep deckled edges | On | With Crop off print borders ticked, a print with a deckled (scalloped) edge keeps its whole border, cropped out to the scallops' tips. Untick it to trim deckled prints like any other. |
| Crop edge | Trim in 0.30% (shown as -0.30) | A slider from Trim in (up to 3%) through 0 (on the edge) to Leave a margin (up to 4%), with the number beside it, as a share of the short side. Left of 0 moves every side in, so no thin line of background shows. At 0 the crop sits on the edge found, and where the picture is dark against an edge (a dark boat or shoreline running right to a slide mount) the crop goes to the outer end of the edge's soft fall-off. Right of 0 leaves that much of the background showing all round, so nothing at the picture's edge is lost. A thin dark line may show along some edges at 0 and above. It works together with Crop inside rounded or mounted corners: the corners are cleared first, then the crop moves in or out from there by this setting. |
| Crop inside rounded or mounted corners | Off | For prints with rounded corners, or held by black photo corners or a mount whose corners overlap the picture. Each side moves in just far enough that no corner shows (at most 15% of the short side). Not used for negatives. |
| Flag photos that look sideways or upside down | On | Adds a "Check rotation" keyword and the purple label to photos that look wrongly turned. Nothing is rotated (see Find and turn sideways photos). |
| Black & White for black-and-white negatives | On | Film negatives only: sets Treatment to Black & White on negatives shot on black-and-white film, before you convert them, with the keyword Black & white negative (see Crop film negatives). |
| Flip slides and negatives scanned backwards | On | Negatives, slides and prints (not album pages): reads any writing in the picture and flips a photo whose writing reads backwards, with the keyword Scanned backwards (flipped) (see Slides and negatives scanned backwards). Adds a few seconds a photo. |
| Check rotation again from scratch | Off | Checks every photo's rotation again, and measures its crop again, instead of reusing the answers saved from an earlier run on the same photo. |
| Replace crops already made | Off | Off: photos that already have a crop or angle are skipped, so your own crops are safe. On: they are cropped again. |
| Leave unsure photos uncropped (yellow label, with the reason in its note) | Off | When a photo's edges barely show against the background, the photo is left as it was instead of guessed at. It gets the yellow label and a note saying why, for example "Not cropped: Squarewell was not sure of the edges (…), so the photo was left as it was." On an album page only the doubtful print is left out. Unticked (the default), such a photo is cropped and gets the yellow label and the keyword Check crop instead. A later run that crops the photo takes the yellow label off. For film negatives it works only with a film format chosen: a frame that doesn't fit the format is then left uncropped. |
| Build Standard previews of the cropped photos when done | Off | Lightroom only. After the crops are set, Lightroom builds a Standard preview of each cropped photo (and each album copy), so the grid and Loupe show the new crops at once instead of "Loading". The size beside it should match Catalog Settings > File Handling > Standard Preview Size in Lightroom, so the preview is kept (Auto works it out from your screen, as Lightroom's Auto does). It adds time at the end of a run; Cancel skips the rest. On hundreds of photos it is faster to leave it off and use Library > Previews > Build Standard-Sized Previews afterwards. |
What Crop edge does. Squarewell finds each side of the print, then moves the crop in by the Crop edge share of the photo's short side. The picture below shows the edges of five real prints, enlarged, with the background at the top of each strip and a line where each setting cuts. At 0.15% a thin sliver of straightedge, tape or background often stays in the crop; at 0.30%, the default, most are gone. Move the slider further left if a line still shows on your setup (Example 5 needs 0.40%), or toward 0 to keep every bit of the picture.
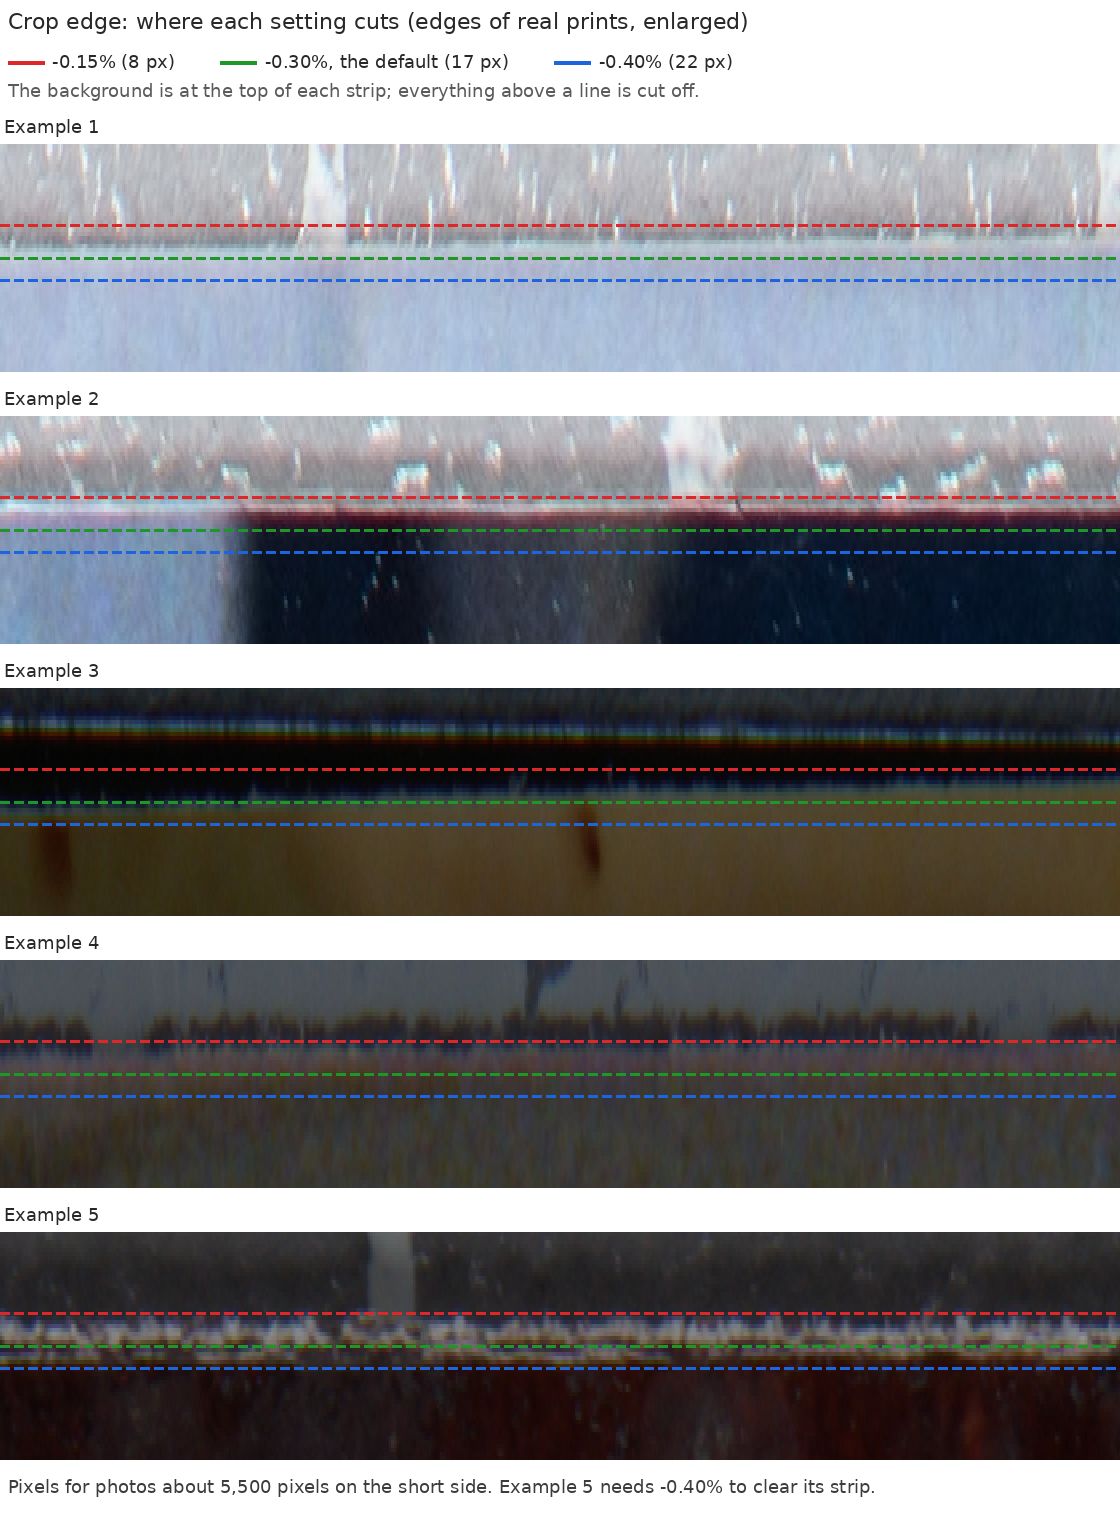
The options are remembered for next time. At the bottom of the dialog is the trial or license status, with Buy a license while on the free trial (see License and free trial).
Profiles
A profile keeps every option of the dialog under a name: the kind of photo, the film format, print borders, crop edge, corners, the rotation flag, replacing crops, TIFF copies, previews and leaving unsure photos uncropped. Use one for each kind of work you do often.
- Choosing one: pick it from the Profile list at the top of the dialog. Its settings fill in the options. None (the settings last used) leaves the options as you last set them.
- (changed): after you change an option, "(changed)" shows beside the profile's name until you save it. The run uses the options as they are in the dialog.
- Save puts the options now in the dialog into the chosen profile. Save as... saves them under a new name (a name already in the list is replaced, after asking). Rename... and Delete change the chosen profile. Deleting one leaves the options in the dialog as they are.
- The starter profiles: "Film negatives (35mm)" (Film negatives, film format 35mm full frame), "Slides" (Slides only, 1.6.82), "Slides and prints" (the usual options) and "Album pages" (Album pages). Updating to 1.6.82 adds "Slides" to your profiles once; if you delete it, it stays deleted. You can change them like any other. File > Plug-in Manager > Profiles > Restore the starter profiles puts them back as they came (and brings back any you deleted); your own profiles are kept. In the app it is Restore the starter profiles… in the menu.
- The quick commands: in File > Plug-in Manager > Profiles, each Auto Crop now command can be given a profile of its own. Left at The profile last chosen in the Auto Crop window, it uses that one (see Quick commands and keyboard shortcuts).
- Shared with the app: the plug-in and the app keep the profiles in one file,
AutoCrop-profiles.json, in the PictureOrg folder (Windows:%LOCALAPPDATA%\PictureOrg; Mac:~/Library/Application Support/PictureOrg), so a profile saved in one shows in the other. The app has no options for replacing crops, TIFF copies or previews; when it saves over a profile, those stay as they were. - No special settings per background: Squarewell tells a black background, a white background and a copy stand apart by itself, so the same profile works on each.
- The error log and Check my setup say which profile is in use.
Film format and Image format
126 film: many 126 (Instamatic) cameras lay a semi-transparent dark bar along each side of the picture and along its top or bottom. The picture shows faintly through them, but the crop is the full-strength picture between the bars. The bars are found even on rolls where the picture is about as dark as the bars, by the straight edge each bar makes down the whole frame. When a frame shows only one bar clearly, the other side is placed from the frame width the other frames of the selection showed.
The Film format list, under File content, is for negatives and slides (not album pages). Auto, the default, learns the frame size from the other frames of the strip, else uses a 35mm frame's 3:2. Or choose the format the film was shot in: 35mm full frame (3:2), 35mm half frame (4:3), XPan (65x24), 110, 126, 127 (square), 828, Disc, the medium formats 6x4.5, 6x6, 6x7, 6x8, 6x9, 6x12 and 6x17, 4x5, or Custom ratio (type the long side over the short, from 1 to 6: 1.50 is 3:2). Portrait or landscape is taken from the frame found. The format is saved in profiles.
Image format: with Slides, prints, magazines or documents chosen, the list is called Image format. It shows the formats slides came in, mounted: 35mm full and half frame, XPan, 110, 126, 127, 828, 6x4.5, 6x6 and 6x7. Below a divider it lists print sizes: Wallet print (2.5x3.5), 3x5, 3.5x3.5, 3.5x5, 4x4, 4x6, 5x5, 5x7, 8x10 and the 4x10, 4x11 and 4x12 panoramic prints, then paper and album pages: Letter paper (8.5x11), Legal paper (8.5x14), A5, A4 and A3 paper and the 12x12 album page, then instant prints: Polaroid SX-70 / 600 / i-Type, Polaroid peel-apart, Polaroid Spectra, Polaroid Go, Instax Mini, Instax Square and Instax Wide. Print sizes are not offered for negatives.
- Negatives and slides: a format is used only where the picture itself says too little. A side that can't be seen is placed from the opposite side and the format's shape, and a single frame with no strip to learn from gets the format's shape. A frame found a little off the format's shape is checked for a faint edge where the format puts that side, and the side moves to it when one is there. A slide's window is checked against the format the same way.
- Prints: choose a print size when the batch is a stack of prints of one size. Every side of a print shows against the background, so a print size mostly checks the shape of each print found: a print that fits is cropped as usual. When a print comes out a little short the long way of its shape (an edge lost in a shadow or a dark corner), a print size can move one of those sides out to the print's real edge, never in: only up to 8%, and only where a straight edge shows there, stops at the print's corners and has the background beyond it. The note then says so, for example "right side from the print size". With Crop off print borders ticked, an instant print is checked against the shape of the picture inside its white frame (an SX-70's is square); with it off, against the whole print.
- When a frame or print doesn't fit: a format never forces a crop onto a picture that disagrees with it. It is cropped as found, and its Squarewell note says why, for example "Format: the frame found is 1.67:1, not 3:2 as 35mm full frame is, so it was cropped as found." The message at the end says how many did not fit. With Leave unsure photos uncropped ticked, such a frame is left uncropped instead (yellow label). A frame that runs off the capture is never stretched to the format.
- Sprocket holes: a strip with a row of sprocket holes is 35mm film, so a format for other film (6x6, say) is not used to place its sides; the frame is placed as on Auto, and the note says it differs from the format.
- A photo cut to a circle, oval or ragged shape is left as found.
How the crop is found
- The item:
- On a black background, everything clearly brighter than the background (on a raw file, at least 2.5 times as bright as the darkest part of the frame). On a black background lit from one side, where a print's dark scene can be darker than the lit background, the print is measured as its difference from the background's own level across the frame, and its edges on its own brightness, so the background's grain and the print's shadow beside it are left out.
- On a copy stand's gray or tinted grid board, everything that differs from the board, lighter, darker or in color, measured against the board's own level all over the frame, so uneven light doesn't matter. The board's grid lines are smoothed away first, and a print's soft shadow on the board (up to about half a stop darker) counts as board. A pale, low-contrast print on a gray board is found, and so is a board that shows only as a thin strip round a large item (a scrapbook page filling the frame). A print lying right against one of the board's lines, with only a sliver of board between, is cropped at its own edge, not the line's.
- On a white background, where a print lies flat and casts almost no shadow, anything even a little darker than the background (about a sixth of a stop) or of another color is the item; so is anything clearly lighter (a glossy print's pale sky catching more light than white card under a camera). Where a pale sky matches the white card in places, the print's straight outline round it is used, so a pale sky along the top is not cut short. A print's soft gray shadow on white card is left out even with Crop off print borders unticked.
- The item's rectangle is taken from the middles of its sides, so tape or fingers at its corners don't move it, and a stretch of picture that matches the board (a white door frame running to the edge) doesn't either.
- Slides: a slide in a dark mount on black is cropped to the mount's window (rounded corners included), not the mount. A bright slide on pure black is not cropped out into the faint glow round it, and a small slide ringed by a halo of light (a subminiature slide, or a mount with a halo round a hard frame) is cropped to its window.
- Tape and rulers: a print held down with brightly colored tape (blue painter's tape, say) on black card is found without the tape, whether the tape lies over a corner or runs along a whole side, and whole even where its dark parts match the card. A print taped down under a ruler is cropped at its own edge, not the ruler's or the tape's. On a grid board, a strip of translucent tape running along the edge of the frame and onto the print doesn't join the print to the frame.
- Prints bigger than the frame: on a copy stand, with a strip of board showing along one side only, the print is cropped at its own edge, tape over the board included. On a dark board, where the picture is dark along that edge (a night sky, a dark backdrop), the crop goes to where the board begins.
- A print on a black background whose folds catch the light is cropped to the print, not to the frame's sides. A negative or print that fills the frame on a light table loses the thin white strips of table along the frame. An oval print whose edge matches the background on one side is boxed whole.
- The angle: the turn that makes the item's four edges sharpest, within 1.5° either way, also checked for the turn that keeps the most picture inside all four edges.
- Each edge: where the brightness rises from the surround to the picture, passing over a mount's glow and dark bands such as the film's rebate.
- Along each edge: the edge is measured in 16 short stretches. A wavy or slightly crooked edge moves the side in so no surround shows anywhere; a stretch that jumps well past the rest is a dark part of the picture, not surround, and is ignored. Where the picture is bright against the edge, the edge shows most clearly, so those stretches count most; and where the slide mount's shadow dims the last few pixels of picture, those pixels are kept as picture.
- Print border, crop edge: as set in the options.
A dark object in the picture that runs right up to an edge, such as a chair or table leg, is as dark as the background, so the edge seems to be on the object's far side. When part of the side shows one straight edge further out and the rest scatter inside it, the straight edge is used, so the object is kept rather than the whole side being cropped in.
A print pushed into a metal corner piece or against a straightedge, or lying along one of a grid board's lines, can seem joined to the board. When the crop then comes out as the whole photo, or with one side running out to the edge of the photo, Squarewell looks for the print's own straight sides: each must run straight along the whole side, and together they must make one of the usual print sizes (4x6, 3.5x5, 5x7, 8x10, square and others). Where a side would cut off a wide strip, the print's other sides must stop at it, so a print that really runs off the photo is left as it is.
The batch check
Slides shot in the same carrier sit in nearly the same place in every photo. After every photo has been measured, Squarewell looks for the place most photos agree on for each side. When a photo's side is off from that place, its other sides agree with the batch, and the photo has a clear edge near the agreed place, that edge is used instead. This fixes most slides where a glow or a dark stretch of picture threw an edge off.
- Select photos from the same slide or negative carrier together. Mixed selections are fine: photos whose other sides don't agree with the batch are left alone, so a session of prints in different sizes can be selected all at once. Prints are measured one by one and gain nothing from the batch check.
- Sides that run off the edge of the frame are never moved by the batch check.
A photo Squarewell isn't sure of (no clear edge on two or more sides) is never left out unless you tick Leave unsure photos uncropped. It is cropped and gets the yellow label and the keyword Check crop. When the photos just before and after it agree on a size and its own crop is within about 8% of it, it is drawn at their size. A print or slide whose edges were clear is never resized, so odd-size prints keep their own crop. A crop that keeps the whole picture because no edge was found anywhere, or that is only a narrow strip of the picture, also gets the yellow label and Check crop, so no photo passes without a look.
The learned background
On a copy stand the camera, the board, the lighting and anything fixed to the stand (tape, a straightedge, a ruler) stay where they are while the prints change. When you crop three or more photos from the same setup together, Squarewell learns that background from them: the board with its grid lines, the tape and anything else that sits in the same place in most of the photos. A photo whose crop came out weak (it ran to the edge of the frame, took in a strip of tape, came out an irregular shape, or left a good part of the print outside it) is measured once more with the learned background painted out, and the new crop is used when it is clearly better.
- Nothing needs to be turned on. A single photo, two photos, or photos from different setups are cropped exactly as before.
- Photos cropped this way get the note "Learned background", and the message at the end says how many there were.
- Select all the photos from one session on the stand together: the more photos, the better the background is learned. Moving the camera part way through starts a new setup, which is learned on its own when it has three photos or more. Tape moved or laid again part way through is learned only where most photos agree on it.
Slides whose picture window isn't square
If the camera was a hair off square to a slide, the picture's window is a slight trapezoid: one edge slopes while the opposite one doesn't. No straight crop can follow every edge. Squarewell chooses no black: the crop sits just inside every edge and trims a sliver where the window narrows. Fix individual photos by hand in the Crop tool if that sliver matters.
Irregular shapes
Some photos were cut to a circle, an oval or a ragged shape. Lightroom can only crop to a rectangle, so these get the rectangle around the whole photo: nothing of the photo is cut off, and the background shows in the corners. A round or oval photo is left straight; a ragged cut keeps the tilt of its best-fitting rectangle, on a copy stand's gray board too. Each one gets the keyword Picture Org > Irregular shape (left out of exports) and the green label, and the message at the end says how many there were, so you can filter on "Irregular shape" and check them. A photo counts as irregular when its outline fills less than 90% of the rectangle around it; ordinary prints and slides fill 95% or more.
Labels, keywords and notes
Color labels: photos Squarewell wants you to look at get a color label, so they stand out in the grid:
- purple: check rotation (see Find and turn sideways photos)
- green: irregular shape (see Irregular shapes)
- blue: an album print kept whole for the writing on its border
- yellow: a crop to check (keyword Check crop): a frame drawn at the size of the frames beside it, a photo whose edges Squarewell wasn't sure of, or a crop that kept the whole picture or is only a narrow strip; or a photo left uncropped because of that (Leave unsure photos uncropped)
A photo with more than one gets the first of these. A label goes with its keyword: when a later run (with Replace crops already made) finds the photo no longer needs a look and takes off "Check rotation" or "Irregular shape", the purple or green label goes too, so the labels and keywords always agree. A label on a photo without those keywords is yours and is never removed. The app does the same in sidecars it updates. A print kept whole with its deckled border gets the keyword Deckled edge (no label), so you can find those prints too, as do a flipped backwards scan (Scanned backwards (flipped)) and a black-and-white negative set to Black & White (Black & white negative). The keywords sit under Picture Org, the one keyword every Picture Org app files its keywords under, and are never included in exported files. Earlier versions filed them under Auto Crop: once you've run this version, you can delete that keyword in the Keyword List.
The reason on the photo: each photo that gets a color label, or isn't cropped, says why in plain words. For example:
- "Check rotation: it looks like it needs a quarter turn to the right (from the faces, 91% sure)."
- "Irregular shape: cropped to the box around the whole photo, so some background shows."
- "Writing on the border: the whole print was kept, border and corners included."
- "Deckled edge: the whole print was kept, its deckled border included."
- "Scanned backwards: flipped left to right (the writing reads "GRAND OPENING")."
- "Not cropped: no photo edges were found against the background. A plain background that is darker or lighter than the photo helps."
In Lightroom the reason is in the Squarewell note field of the Metadata panel. To see it, choose the Squarewell view from the menu at the top of the Metadata panel. The first time, Lightroom asks to update the catalog for the plug-in's new field: click Update. The note is read-only, and you can search it with the Library filter. Each run sets the note, or clears an old one that no longer applies. Check rotation only replaces just the rotation sentence, and Turn the flagged photos takes the rotation sentence out of each photo it turns.
In the app the reason shows under each photo on the Check crops screen and in the large view, and the list of photos not cropped says why for each one.
Requirements
- Lightroom Classic (for the plug-in only), a version from the last several years (the plug-in uses SDK 10 and works back to SDK 6). The app doesn't need Lightroom Classic, only a current web browser (Edge, Chrome, Safari, Firefox).
- Windows 10 or 11 (64-bit): nothing else. Python 3.12, OpenCV, rawpy and NumPy are included.
- Mac with Apple silicon (M1 or later), macOS 13 or later: nothing else. Python and the image libraries are inside the Mac download.
- Intel Mac: not supported. Squarewell needs a Mac with Apple silicon (M1 or later).
- Files: raw files (NEF, DNG, CR2, CR3, ARW, ORF, RW2, RAF, PEF, SRW), JPEG and TIFF; the app also takes HEIC and PNG. No need to convert raw files to DNG first. Video files are skipped. Lightroom's merged panoramas and HDRs, DNGs saved with JPEG XL compression, are measured on the smaller copy stored inside the file.
- Background: a black background, or a slide mount on a light box; a copy stand, its gray or tinted grid board or cutting mat, grid lines and all, showing all round the item (also a board photographed close up, with wide grid lines, a ruler taped along the top and tape down a side, even with the print pushed up under the ruler); or a white background: one or more prints scanned on a flatbed with the lid closed, or laid on white card, with or without a white border, even a pale picture with hardly anything darker than the background (for several prints in one scan, see Crop album pages into separate photos). No special settings are needed for each background: Squarewell tells them apart by itself. A light table behind a print is not supported.
- Scans that fill the frame, from a flatbed or a slide scanner with little or no surround, are fine: each side either runs to the frame or ends in a narrow dark band (the mount, the lid's shadow), and the crop leaves out those bands and any print border, including a thin sliver of it along the frame.
- One item per photo, except for album pages.
Undo
- In Lightroom: Edit > Undo Squarewell takes back every crop, keyword and color label in the run. A run of more than 100 photos is saved in parts of 100, named Squarewell (1 of 3) and so on: choose Undo once for each part. The crops already saved into the photo files stay there until you choose Metadata > Save Metadata to Files again after the Undo. (The very first run also creates the keywords themselves, in a step of its own just before.) You can also reset a single photo's crop in the Develop module's Crop tool, or adjust it by hand.
- Album pages: Edit > Undo takes the crops back, but the "Photo" copies stay; delete them in the Library if needed.
- Turn the flagged photos: Edit > Undo turns the photos back, once for each photo.
- In the app: the originals are never changed. Delete the new pictures (or the Auto Crop folder) to start again. A sidecar the app changed keeps a copy of the old one as
photo.xmp.bak.
Troubleshooting
| Message or problem | What to do |
|---|---|
| A crop looks wrong and you want to send it to The Picture Org | Create an error log. In Lightroom: select the photos that came out wrong, then Library > Plug-in Extras > Auto Crop: Create an error log. In the app: Create an error log… in the menu. A text file named "Squarewell error log" with the date is saved on your Desktop and shown in Explorer or Finder, and Squarewell offers to send it to The Picture Org: you see exactly what would be sent, with your home folder, user name, computer name, email addresses and license key already taken out, add a word about what looked wrong (and your email if you would like an answer), and click Send to The Picture Org. It holds the version, your computer's system, your options and the profile in use, each photo's crop as Lightroom (or the app) has it, including any Transform or lens correction that shifts a crop, the end of the log and the Check my setup results. File names are in it, the photos themselves are not, and nothing is sent unless you click Send. Small pictures of the problem photos: Lightroom asks first, with a tick box Include small pictures of the problem photos (the selected ones, up to 50), off unless you tick it; the app's error-log card has the same tick box (it takes the photos in the run that were labeled, not cropped, skipped or changed by hand, up to 50). Each picture is the photo made small (about 1000 pixels), with the background it found shaded blue, the outline it found in yellow, the crop it found in green, the crop the photo has now in red, and the reason line under it. There is one picture for each photo file: an album page is drawn once, with all its prints' crops on it, the way your last run cropped them. They go in one zip with the log (about 15 MB at most) on your Desktop. When you send the log, the pictures go only if you also tick Also send the small pictures (off unless you tick it), so you don't need to send the originals. They show your photos, so only tick it if you are happy to send them. |
| "Left n converted negative(s) as they were" | Those photos were already converted to positives (Negative Lab Pro or an inverted tone curve), and you chose Skip them (or they are album pages). Run Squarewell again and choose Crop them too to crop them; their colors stay as they are. |
| You want to check that everything Squarewell needs works on this computer, or support asks you to | Check my setup. In Lightroom: File > Plug-in Manager, select Squarewell, and click the button in the Check my setup section. In the app: Check my setup… in the menu. It checks Lightroom's version and the system, its Python, the image libraries, the camera raw reader, the readers for newer compressed DNGs (JPEG XL) and iPhone HEIC photos, the rotation check, saving in its log folder, the license or free trial (never the key itself), the last update check and the profile in use. It ends "Everything looks fine." or "Missing: …". Click Copy or Save on the Desktop to email it. It is also included in an error log. |
| "The bundled Python (python-win folder) is missing" | The folder was moved or partly copied. Unzip the plug-in again, all of it. |
| The Squarewell menu items appear twice, or the Plug-in Manager lists Squarewell (or Picture Org Auto Crop) twice | Squarewell is installed twice: once by the Setup program or Mac installer, once added by hand. In File > Plug-in Manager, select the entry whose path is not in Adobe/Lightroom/Modules and click Remove. You can then delete that old folder; your settings and license key are kept. |
| Nothing under Plug-in Extras after running the Setup program or Mac installer | Quit Lightroom Classic completely and start it again: it looks in its plug-in folder only when it starts. In File > Plug-in Manager, Squarewell should be listed and enabled; if it is listed but disabled, click Enable. |
| "needs a Mac with Apple silicon" (Mac) | Squarewell runs only on a Mac with Apple silicon (M1 or later). This Mac has an Intel processor. The Windows version runs on any 64-bit Windows 10 or 11 PC. |
| macOS says the plug-in's Python can't be opened (plug-in installed by hand, Apple silicon) | Go to System Settings > Privacy & Security and click Open Anyway, then run Squarewell again. |
| A photo is listed under "Not cropped" | Usually no clear item against the background (a black background, a white background or a copy stand). The reason is in the message and in the photo's Squarewell note (see Labels, keywords and notes). Details are in autocrop-log.txt in the temp folder (Windows: C:\Users\<you>\AppData\Local\Temp, or type %TEMP% in File Explorer's address bar; Mac: the folder echo $TMPDIR shows in Terminal). The message gives the full path at its end. |
| "Lightroom changed these values" | Lightroom adjusted a crop as it applied it. Create an error log (first row) so The Picture Org can see what changed; the message is in it. |
| "The file name or folder has a tab or line break in it" | Rename the file or folder without the tab or line break (it can come from a copied name), then run Squarewell on it again. |
| Photos with crops were skipped | Tick Replace crops already made. |
| A negative, slide or print's note says "Format: the frame found is …, so it was cropped as found" | The frame doesn't fit the film format chosen (see Film format and Image format). Check the crop. If the whole roll is another format, choose that one, or Auto, and run again with Replace crops already made. |
| "Nothing was saved: the profiles file could not be read" | The file AutoCrop-profiles.json in the PictureOrg folder is damaged. The starter profiles are shown meanwhile. Move that file somewhere else (it is never written over), and the list starts again. |
| "(changed)" shows beside the profile | An option differs from the profile. Click Save to keep it in the profile, or choose the profile again to go back to its settings. |
| Remove is grayed out in the Plug-in Manager | Normal for a plug-in installed by the Setup program or Mac installer: Lightroom loads it from its own plug-in folder and only lets you Disable it there. To remove it, use Uninstall Squarewell (see Install), or delete the PictureOrgAutoCrop.lrplugin folder from Lightroom's Modules folder with Lightroom closed. |
| Windows Setup says "Error opening file for writing" | The Squarewell app was still running: it keeps going for a couple of minutes after its window is closed. Setup closes it for you; if the message still shows, wait a moment and click Retry, or end pythonw.exe in Task Manager first. |
| A crop cuts off detail right at a slide mount's edge | Run those photos again with Crop edge at 0, or a little to the right of it (and Replace crops already made). |
| A crop shows a thin line of background | Move Crop edge a little to the left (Trim in 0.5%), or adjust that photo by hand. |
| A crop cuts too far in | Usually a photo whose picture runs dark right to the edge. Adjust by hand, and create an error log for it (first row) so it can be used as a test case. |
| A photo is flagged for rotation but is the right way up | Remove the keyword (the purple label stays; remove it with Photo > Set Color Label > None if you don't want it). Send the photo to The Picture Org as a test case. |
| One photo's crop is shifted compared with others from the same run | That photo probably had earlier edits (Transform, Upright, Lens Corrections), which Lightroom applies before the crop. In Develop, click Reset, then run again with Replace crops already made. |
| A negative's crop includes rebate or cuts into the picture | Select the whole strip or roll and run again with Replace crops already made: the other frames fill in edges that can't be seen. Send the frame to The Picture Org as a test case. |
| A sideways photo is not flagged | The guess misses some (see Find and turn sideways photos). Check the last line of autocrop-log.txt: "Lightroom rotation given for 0 of N photos" means your Lightroom version doesn't report its rotation, so the file's own was used; tell The Picture Org. |
| Turn the flagged photos stops with "did not turn as expected" | Use Edit > Undo, make sure you have the current version (see Updates), and run it again. |
What is in autocrop-log.txt |
For each run: a line with the date, version, system and options, then each photo's result (crop, angle, rotation flag, note), then what Lightroom stored for each photo. Errors are recorded too. The error log (first row) includes the end of it, so you don't need to find it yourself. Once it passes 2 MB it is renamed autocrop-log.old.txt (replacing the older one) and a new one starts. |
| "The trial has ended. Enter a license key…" | Buy a license, or enter your key (see License and free trial). |
| "That key is not valid" | Paste the whole key from your order email, including the dot in the middle. Spaces and line breaks don't matter. |
| "That key is for an older version" | The key is for an earlier major version; an upgrade key is needed for this one. |
| The app: nothing opens, or the page says "Please open Squarewell from its shortcut" | Start it from its shortcut (Windows Start menu, Mac Applications > ThePictureOrg); it opens the page with its own address. If a browser tab from an earlier session is left open, close it. If nothing opens at all, look at the end of AutoCrop-app-log.txt in the PictureOrg folder (Windows: %LOCALAPPDATA%\PictureOrg; Mac: ~/Library/Application Support/PictureOrg). |
| The app: Choose a folder… does nothing | The folder window may have opened behind the browser: look in the taskbar or Dock. Or paste the folder's path into the box and click Use. |
| The app on a Mac: "Squarewell could not start" | Open Install Squarewell from the download again. |
| Lightroom doesn't show the crop from an app sidecar | Sidecars are read only for camera raw files, and only when Lightroom reads metadata: select the photos, Metadata > Read Metadata from Files. For DNG, JPEG and TIFF use new pictures or the plug-in (see Check every crop before saving, with the app). |
Keyboard and Stream Deck
Every action in Squarewell has a key, and the same kind of action has the same key in every -well app: F chooses a folder, G starts the main step, X stops. Anything that writes, moves, renames or deletes files needs Shift (Shift+W saves), so a stray key press never changes your files. Keys do nothing while you are typing in a box, or while a card covers the button. Press ? in the app to see the keys for the screen you're on.
The keys
A key does exactly what clicking its button does, and only when that button is on the screen.
| Key | Does | Name for a Stream Deck button |
|---|---|---|
| F | Choose a folder | folder |
| P | Choose photos | photos |
| G | Find crops | go |
| X | Cancel | stop |
| Shift+W | Save | write |
| N | Crop more photos | new |
| O | Show the finished files | open |
| A | Tick all shown | tick-all |
| Shift+A | Untick all shown | untick-all |
| 1 to 9 | Pick a filter tab (1 = the first) | filter-1 to filter-9 |
| Left arrow | Previous photo | prev |
| Right arrow | Next photo | next |
| Space | Tick or untick this photo | tick |
| Enter | Open the photo / OK | enter |
| Esc | Close the viewer or card | close |
| H or F1 | User Guide | guide |
| E | Create an error log | report |
| K | Check my setup | check |
| L | License... | license |
| T | Settings | settings |
| Shift+Q | Quit | quit |
| S | Slides, prints | slides |
| M | Film negatives | negatives |
| Y | Album pages | albums |
| B | Before and after | before-after |
| [ | Turn the crop left 0.1° | turn-left |
| ] | Turn the crop right 0.1° | turn-right |
| Backspace | Undo my changes to this crop | reset |
| V | Where and how to save | save-options |
| ? | Show the list of keys | keys |
Stream Deck and other macro pads
Any macro pad that sends keystrokes (a Stream Deck Hotkey button, a Loupedeck, a programmable keyboard) can press the keys above while Squarewell's window is in front.
For buttons that work while Squarewell is behind other windows, add The Picture Org -well tools for Stream Deck, which comes with Squarewell: press ? in Squarewell and click Add Stream Deck buttons (the Stream Deck app, free from Elgato, must be installed). The Stream Deck app asks to install it. It adds two ready-made profiles, The Picture Org apps (a folder for each app with its window's actions) and The Picture Org in Lightroom (a folder for each app with its Lightroom commands), and two buttons under The Picture Org for building your own:
- App action: pick Squarewell and an action. The button shows the app's icon and the action's name; pressing it runs the action in Squarewell, opening the app first if it isn't open. A check mark means it ran; a warning triangle means the button wasn't on the screen (or the app couldn't be reached).
- Lightroom command: pick Squarewell and one of its Lightroom commands. It runs in Lightroom Classic on the photos selected there, exactly as if you chose it from Library > Plug-in Extras. Lightroom must be open with the Squarewell plug-in enabled.
To put the ready-made buttons into a profile you already use (your own Lightroom profile, say), right-click an app's folder in the ready-made profile, choose Copy, then right-click an empty key in your profile and choose Paste: the folder comes with all its buttons, and its top-left key goes back.
Other tools can do the same from a command line: Squarewell --do <name> (on Windows, Squarewell.exe in Squarewell's folder), using the names in the tables. It only reaches the copy of Squarewell running for you on this computer.
Lightroom Classic
Lightroom doesn't let a plug-in use keyboard keys or put a shortcut on its menu items, so ? works only in the Squarewell app's own window. In Lightroom, click Keyboard shortcuts (in the Squarewell window, next to User Guide, or in the Plug-in Manager) to see Squarewell's commands and the ways to run them without the menu, and to add the Stream Deck buttons. The Squarewell plug-in listens for Squarewell --do lr:<name> (and the Stream Deck button) instead, on this computer only:
| Library > Plug-in Extras | Name |
|---|---|
| Auto Crop & Straighten... | lr:crop |
| Auto Crop now: slides and prints | lr:slides |
| Auto Crop now: film negatives | lr:negatives |
| Auto Crop now: album pages | lr:albums |
| Check rotation only | lr:rotation |
| Set white balance only (negatives) | lr:whitebalance |
| Turn the flagged photos | lr:turn-flagged |
Your own keys in Lightroom. In the Keyboard shortcuts window, choose a key for any of Squarewell's commands (for example Ctrl+Alt+Shift+C, or an F key on its own) and click Save keys. Keys are shared by all Picture Org plug-ins, so one key runs one command, and the window tells you if another plug-in already has the key you picked or if Lightroom uses it itself. The keys don't click through the menu: they hand the command straight to the plug-in, so they keep working when you add, remove or rename other plug-ins.
- Windows: the keys work while Lightroom is the window in front, and every other program keeps them. A small helper that comes with Squarewell (The Picture Org Lightroom keys) starts with Lightroom and stops a little after Lightroom closes; it never watches your typing. If another program already holds a key, the window says so: choose another.
- Mac: your keys go into the Mac's own App Shortcuts for Lightroom Classic (System Settings > Keyboard > Keyboard Shortcuts > App Shortcuts) and work once you quit and reopen Lightroom. Any App Shortcuts you made yourself are kept.
Install
There are three downloads. The installers ask what to install: the Lightroom Classic plug-in, the standalone app (no Lightroom needed), or both. One license covers both, and you can run the installer again later to add the other.
Windows: the Setup program (ThePictureOrg-Squarewell-Setup-<version>.exe)
- If you are installing the plug-in, close Lightroom Classic.
- Double-click the Setup program. If Windows shows "Windows protected your PC", click More info, then Run anyway.
- Accept the license, tick what to install and click Install.
- The app is in the Start menu as Squarewell. For the plug-in, start Lightroom Classic. It is under Library > Plug-in Extras > Auto Crop & Straighten...
Mac: the Install Squarewell app (ThePictureOrg-Squarewell-Mac-<version>.zip)
A Mac with Apple silicon (M1 or later) and macOS 13 or later. Intel Macs aren't supported: on one, the installer says so and stops. The Windows version runs on any 64-bit Windows 10 or 11 PC.
- Double-click the zip to unzip it. If you are installing the plug-in, quit Lightroom Classic.
- Double-click Install Squarewell, and click Open when macOS asks. It is signed and checked by Apple.
- Choose what to install and click Install.
- The app is in Applications > ThePictureOrg. For the plug-in, start Lightroom Classic. It is under Library > Plug-in Extras > Auto Crop & Straighten...
Updating and removing: run the installer from the new download the same way, or click Install now when Squarewell offers an update (see Updates). Your settings and license key are kept. To remove Squarewell, use Uninstall Squarewell in the Start menu on Windows, or the Uninstall Squarewell app in the Mac download.
Installing the plug-in by hand: on Windows, right-click ThePictureOrg-Squarewell-Win-<version>.zip, choose Properties, tick Unblock, and unzip it. On a Mac, right-click Install Squarewell, choose Show Package Contents and open Contents > Resources. Move the PictureOrgAutoCrop.lrplugin folder somewhere permanent, then in Lightroom Classic choose File > Plug-in Manager > Add and pick it. Use one way or the other, not both, or the menu appears twice.
Where it goes: the installers put the plug-in in Lightroom's own plug-in folder for your user account, where Lightroom finds it by itself (%APPDATA%\Adobe\Lightroom\Modules\PictureOrgAutoCrop.lrplugin on Windows, ~/Library/Application Support/Adobe/Lightroom/Modules/PictureOrgAutoCrop.lrplugin on a Mac). No administrator password is needed. If the Mac installer has a problem, it keeps a log for support in ~/Library/Logs/PictureOrg/AutoCrop-install.log.
License and free trial
- Free trial: every feature works for 21 days on each computer. The Plug-in Manager panel and the app show how many days are left, for example "Free trial: 14 days left".
- After the trial: for 7 more days Squarewell still works, with a reminder. After that, it stops cropping new photos. Crops and keywords already made stay as they are. When a license key is needed, Squarewell says "the free trial has ended" and offers Buy a license and Enter key....
- Buying: click Buy a license in the License section of File > Plug-in Manager (select Squarewell), or on the license line at the top of the app, or go to thepictureorg.com/tools. One license is for one person on up to 2 computers, covers the app and the Lightroom plug-in, and includes complimentary updates within the major version (a version 1 key works for every 1.x release).
- Entering your key: paste the whole key from your order email into the License key box in the Plug-in Manager and click Enter key, or click the license line at the top of the app. Spaces and line breaks don't matter. It then says "Licensed to" and your name. The key is checked on this computer: nothing is sent anywhere, and no internet connection is needed.
- Plug-in and app: one license, one free trial. The plug-in and the app share the key and the 21-day count on each computer, so a key entered in either unlocks both.
- Bundle key: the Well Tools Bundle key covers Spoolwell, Squarewell, Pivotwell, Datewell and Labelwell. Entered in any one of them, it unlocks all of them on that computer.
- New computer: click Remove license from this computer on the old one (it asks first; a bundle key is removed from every app in the bundle on that computer), then enter the key on the new one.
- Where the key is kept: in your user account, not in the program's folder, so it stays through updates and reinstalling:
%LOCALAPPDATA%\PictureOrgon Windows,~/Library/Application Support/PictureOrgon a Mac.
Updates
- Automatic check: every time Lightroom starts, and once a day while it stays open, Squarewell looks up the current version number on thepictureorg.com's download service, in the background. Only that small version list is fetched: nothing about your computer, your photos or your license key is sent.
- When a new version is out: the next time you run Squarewell, a message says so once per Lightroom session: Install now (or Download), Not now (asks again next time you start Lightroom) and Skip this version (stays quiet until a later version comes out). Nothing is downloaded or installed until you click.
- Install now: Squarewell downloads the update, checks that it arrived whole and unchanged, that it carries The Picture Org's release signature and that it is newer than the version you have, and installs it into its own folder and the standalone app's (when you have both), with a progress bar. Then quit and restart Lightroom Classic to start using it. If anything goes wrong, every file is put back as it was.
- Download: opens the installer download in your browser; close Lightroom Classic and run the new Setup program (Windows) or Install Squarewell (Mac). Your settings and license key are kept either way.
- Plug-in Manager > Updates: shows your version and whether a newer one is out, with Check now, Install update, Download installer and What's new. Untick Check for updates automatically to turn the automatic check off; Check now still works. When an update can't be installed from inside your version, the panel says to use Download installer for that one.
- The app checks every time it opens, and Check for updates checks at any time. When a new version is out, a bar at the top lets you install it (the app installs it into its own folder, then restarts itself), download the installer, see what's new, leave it for now, or skip that version. Installing an update in either one updates both: the plug-in in Lightroom and the app. Restart Lightroom Classic afterwards if it was open.
Updates within the major version are complimentary.
Help
- Check my setup (in the app's menu, or in File > Plug-in Manager with Squarewell selected) checks that everything Squarewell needs works on this computer, and shows the result as text you can copy or save.
- Create an error log (in the app's menu, or Library > Plug-in Extras > Auto Crop: Create an error log) saves a text file on your Desktop with what Squarewell did, then offers to send it to The Picture Org. You see exactly what would be sent before anything goes: your home folder, user name, computer name, email addresses and license key are already taken out, and you can delete anything else. Add a few words about what went wrong, and your email if you would like an answer, then click Send to The Picture Org. File and folder names are in it; your photos aren't. Nothing is sent unless you click Send. Without an internet connection, email the file instead.
Appendix: What's new
- 1.6.85: Prints held on a board with colored tape, such as blue painter's tape, are cropped to the print without the tape. Prints on a dark cutting mat with white grid lines are cropped to the print without tape too, including small prints and prints that fill most of the frame. With Crop off print borders ticked, a white border with a worn edge is trimmed all the way; with it unticked, the background Squarewell learns during a run no longer takes in the prints' white borders.
- 1.6.87: Prints with a deckled edge are cropped right at the tips of their scallops, without a thin band of board beside them. On album pages, a dark print on a black page is no longer cut in two, a print whose light sky came apart from the rest of the picture is cropped whole, and typed captions on a striped page come out as notes again.
- 1.6.86: Tape that runs on past a print's corner is no longer left as a thin strip inside the crop. On a cutting mat, a strip of mat at the edge of the picture is cropped off, and the mat is recognized even when a large print hides most of its grid lines. With Crop off print borders unticked, the learned background no longer cuts off white print borders, and in a batch of prints of different sizes, crops are no longer pulled to one shared place.
- 1.6.84: Security: a full installer an update needs runs only with The Picture Org's own release signature and when it is newer than your copy. The "Checking your setup..." box closes as soon as the check is done. Faster runs that use less memory; a run of more than 100 photos is undone 100 photos at a time.
- 1.6.83: Slides scanned on a black background are cropped to the whole picture, no longer cut off where a bright part meets a dark foreground or sky. On album pages, prints laid edge to edge or next to the page edge are found as separate photos, tape, paper scraps and blank borders are no longer taken for notes, and a print with page or tape along a side is cropped to the print. Prints on a dark board with a dark side are no longer cut off there, and cabinet cards with Crop off print borders no longer keep the plain card below the picture.
- 1.6.82: A Slides only choice under File content, and a starter profile "Slides", for runs of slides: no deckled-edge marks, film formats only. Rotation flags go by any writing in the picture too, so a sign photographed sideways is flagged the right way, and fewer upright slides are flagged by mistake (windows taken for faces, a pale wall taken for sky); more sideways slides are flagged. Dusk slides on a black background are no longer cut off at the skyline (with Slides only, sunsets and mountains with dark ground too). The backwards-scan check takes about half the time, and a flipped photo's rotation flag is right for the flipped photo.
- 1.6.81: Prints on a black or blue cutting mat with white grid lines are cropped to the print, without the mat or the painter's tape beside it, and a print that nearly fills the frame no longer keeps a strip of mat along one side. On a Mac, Squarewell needs Apple silicon (M1 or later).
- 1.6.80: Prints with a deckled edge are cropped out to the tips of their scallops on every side, also with Crop off print borders unticked. On album pages, prints joined by tape or overlapping are found as separate photos, prints laid one above the other are split at the gap, a print found in pieces is put back together, and a page scanned sideways is numbered in reading order as it should be turned. A thin wisp of a silver straightedge along a print is trimmed off. Black-and-white negatives get the Adobe Monochrome profile, so they show in black and white. White balance from the film base works on negatives on a dark background. Build Standard previews is off in the starter profiles. Keywords now sit under Picture Org, shared by every Picture Org app.
- 1.6.79: Slides and film scanned out of their mounts: where the film's dark border fades softly into the picture, the crop now goes past it, so no thin dark line shows along an edge.
- 1.6.78: Slides and negatives scanned backwards are flipped, read from the writing in them (see Slides and negatives scanned backwards). Black-and-white negatives get Treatment Black & White before you convert them (see Crop film negatives). Rotation answers are shared with Pivotwell. Python 3.13: install this version with its Setup or the Mac download.
- 1.6.77: A print that fills the frame on two sides that meet at a corner is now cropped to the print when the grid board shows along only one of the other two sides, or is a narrow strip.
- 1.6.76: A print that fills the frame on two sides that meet at a corner, with a wide strip of grid board along the other two, is cropped to the print. Before, the crop could keep most of the board.
- 1.6.75: Prints held down with tape are cropped to the print without the tape, even when the print is bowed. A page of several prints run as single photos is cropped to the box around them and labeled yellow (Check crop) with a note that Album mode crops each print. A print whose cream or white border fills the frame keeps all of its border when you keep borders, and a snapshot with no board around it keeps the whole picture instead of a box around the people. Prints running off the frame on two sides beside tape are cropped to the print alone. The Keyboard shortcuts window can also give a key to another plug-in's menu item, such as Negative Lab Pro, by its name.
- 1.6.74: No missed frames in a roll of negatives: each frame is checked against the frames beside it, and one that isn't their size is drawn at their size and labeled yellow (keyword Check crop) for you to check. Slides and prints whose edges Squarewell wasn't sure of get the same yellow flag, and their neighbors' size when it's close, instead of being guessed at silently. So does a crop that kept the whole picture or is only a narrow strip. Prints that fill the frame on two or three sides of a grid board or black base, and small oval prints on a black background, are now cropped instead of kept whole. Negatives already converted in Negative Lab Pro can be cropped again after a warning; their colors stay as they are. In the app, a long run no longer loses its crops when the browser puts the tab to sleep, and Cancel stops within a second.
- 1.6.73: Set white balance only (negatives) in Library > Plug-in Extras sets the white balance of negatives you have already cropped, from the film base around their crop, and changes nothing else. 126 film negatives with very dark bars are cropped between the bars instead of being left whole or cropped across a bar.
- 1.6.72: A negative converted in Negative Lab Pro and then unconverted (Unvert in Negative Lab Pro, or Reset in Lightroom) is cropped again like any other negative. The Plug-in Manager's update message no longer runs off the right edge.
- 1.6.71: Choose your own keys for Squarewell's Lightroom commands (Keyboard shortcuts in the Plug-in Manager). Image format adds Letter, Legal, A5, A4 and A3 paper and 12x12 album pages. Running the same photos again is much quicker: each crop is remembered with its rotation answer, and Check rotation again from scratch now measures the crops again too. A white-bordered print running off the frame on a gray grid board, its picture as light as its border, is cropped to the print. Also save each photo as a 16-bit TIFF no longer stops on a copy Lightroom couldn't export. Python 3.13.
- 1.6.70: Prints that fill the frame on two or three sides on a black base are cropped right where the picture runs to the frame, even where its edge is dark (a car door, a night sky), and a pale sky along one side is no longer taken for a white border. Prints on a black grid board with orange tape, borders kept, are cropped to the print. Build Standard previews is now off unless ticked, builds more at once, and has a size choice to match Lightroom's Standard Preview Size.
- 1.6.69: Crop edge and Crop inside rounded or mounted corners now work together, so you can clear the corners and still leave a margin. Prints that fill the frame on one, two or three sides, against a black or dark base, are cropped to the print instead of being called an irregular shape. A print's white border is trimmed when it lies against the frame, a steel corner piece or a black grid board, and where the picture near the border is pale (snow or a white sky). More photos turned on their side are spotted for the rotation flag, from the scene and the faces together.
- 1.6.68: Film negatives already converted (by Negative Lab Pro, or inverted with the tone curve) keep their crop, even with Replace crops already made ticked, so a folder selection can't upset colors you've already set. A new option, Set white balance from the film base, sets each negative's white balance from the clear film around it when it is cropped, ready to convert the roll as a group (off unless you tick it; in the app, for XMP sidecars).
- 1.6.67: A print laid against a ruler or an L-square, or with a strip of grid board along one side, is cropped to the print instead of keeping the ruler or board. Crop edge now trims 0.30% by default (was 0.15%), which takes off the thin sliver of straightedge or background that often stayed along a side; your own setting is kept unless it was the old default. The User Guide shows what each Crop edge setting does on real prints. A Keyboard shortcuts button in Squarewell's Lightroom window lists the keys and Stream Deck commands.
- 1.6.66: Setup and the uninstaller show Squarewell's own icon instead of the old logo icon. The User Guide shortcut in the Start menu has its own page icon, so it's easy to tell from the app.
- 1.6.65: A photo whose rotation was checked before, unchanged and cropped the same way, reuses that answer, so a second run is quicker; the answer is always the one the check would give. Check rotation again from scratch checks every photo again.
- 1.6.64: A print that runs off the edge of the photo, or lies a little turned and fills most of it, is straightened and cropped to the print. A print laid right against grid board lines is cropped to the print instead of being left uncropped.
- 1.6.63: A print with a light border in a metal corner piece is cropped to its picture on all four sides. A print lying along a grid board line is cropped to the print, not left running out to the edge of the photo.
- 1.6.62: Stream Deck buttons come with Squarewell: press ? and click Add Stream Deck buttons. Two ready-made Stream Deck profiles: one for the apps, one for Lightroom. The Lightroom listener for Stream Deck buttons also reports what it is doing, so a button that can't reach Lightroom says why.
- 1.6.61: the Squarewell window in Lightroom has a User Guide button, next to the license line at the bottom.
- 1.6.60: a print pushed against a metal straightedge or corner piece, or lying along one of a grid board's lines, is no longer left as the whole photo or with one side running out to the edge of the photo: Squarewell finds the print's own straight sides and checks them against the usual print sizes. Keys for every action in the app (press ? to see them), and buttons for a Stream Deck or other macro pad; in Lightroom, a Stream Deck button can run Squarewell's commands.
- 1.6.59: on a grid board, a print lying right next to one of the board's lines no longer keeps a thin strip of board along that side. While Squarewell is working, Quit, closing the app's browser tab and the x on Lightroom's progress bar ask first (Keep working or stop); minimizing never asks.
- 1.6.58: 126 film negatives whose picture is about as dark as the camera's bars are now cropped between the bars too, instead of being left whole or cropped at an angle.
- 1.6.57: 126 film (Instamatic) negatives are cropped to the picture between the dark bars the camera lays along its sides and along its top or bottom. The picture shows faintly through the bars, but the bars are left out. Prints found with a deckled edge, and kept whole, get the keyword Deckled edge (under Auto Crop, never exported), so you can find them.
- 1.6.56: when only one photo is selected while a folder is chosen in the Folders panel, Squarewell asks whether you meant the whole folder, and offers to crop every photo in it and in the folders inside it.
- 1.6.55: a dark print on a gray board is no longer cropped to just a light patch or an odd-shaped part of it: a crop that leaves much of the print outside it is measured again with the board learned from the batch. A print filling most of the frame on a grid board, with only a thin band of board round it, is cropped to the print. Numbers or writing brushed on a surface that fills the frame (slides used as batch markers) keep the whole frame instead of being taken for a cut-out photo.
- 1.6.54: a print with a deckled edge is cropped out to the tips of its scallops, so its deckled look is kept, with the background showing between them. A new option, Keep deckled edges (on by default), lets you trim deckled prints like any other instead.
- 1.6.53: on an album page, writing on a print's border gets its own copy (Photo 2 note) even when the border is kept: on a print with a deckled edge, and with Crop off print borders unticked.
- 1.6.52: a print with a deckled edge keeps its border when Crop off print borders is ticked, as a document or a print with writing on its border does, so the scallops aren't cut away.
- 1.6.51: Squarewell learns the copy stand's background from the photos you crop together: the board, its grid and anything fixed to the stand, such as tape or a straightedge. A print whose crop took in a strip of tape, or ran out to the frame, is cropped again against that background.
- 1.6.50: Create an error log now offers to send the log to The Picture Org for you, after showing exactly what would be sent. Prints on a copy stand with a metal straightedge or ruler along the edge of the frame are cropped again (they came back uncropped), and a print lying against one of the board's grid lines is cropped to its own edge.
- 1.6.49: after each run, the crops are saved into the photo files' metadata (an .xmp sidecar, or the DNG, JPEG or TIFF file), so they aren't undone by accident; programs that read crop information from the metadata can still change them.
- 1.6.48: the version number moves to 1.x (1.6.48 follows 0.6.47; your license key is unchanged). Squarewell checks for a newer version every time it opens, and installing an update from the app also updates the Lightroom plug-in, and the other way round. Saving TIFF files beside album pages is more reliable on network drives.
- 0.6.47: on Windows, Setup and the uninstaller now close Squarewell if it is still running, so they no longer stop on a file in use.
- 0.6.46: this guide is reorganized, with a quick start and a section for each job. When a job finishes, its message says how long it took ("Took 2 min 14 s"), in Lightroom and in the app. The buttons at the top of the Plug-in Manager panel sit on two rows.
- 0.6.44: prints bigger than the frame on a dark board are cropped at the board when the picture is dark along that edge, and a signed card with a photo printed on it is kept whole. An Other -well tools button joins the Plug-in Manager and the app's menu.
- 0.6.43: the Plug-in Manager has a Squarewell home page button and a User Guide button. In Lightroom the plug-in is listed as tpo: Squarewell™, so all The Picture Org plug-ins sit together.
Coming from an earlier version? Some menu items and options have new names. A keyboard shortcut made for an old menu title needs the new one:
- Auto Crop now: 35mm negatives is now Auto Crop now: film negatives, and the 35mm film negatives (in a carrier) choice is now Film negatives.
- Crop off white or cream borders is now Crop off print borders.
- Format or size is now Image format (for slides and prints).
- Create an error report is now Create an error log.
Earlier versions: see CHANGELOG.txt.
Appendix: What's in the folder
| File or folder | Purpose |
|---|---|
Info.lua |
Tells Lightroom about the plug-in: its name, version and menu items. |
AutoCropMenu.lua |
The menu command: the options dialog, running the helper, applying crops and keywords, the message at the end. |
PluginInfoProvider.lua, logo.png |
The panel shown in File > Plug-in Manager: the website and User Guide buttons, the License section (trial or license status, Buy a license, the box for your key; with a license in place, only Remove license from this computer), and Check my setup. |
Update.lua, Init.lua |
Checking for a newer version (see Updates): once a day in the background, and the Updates section of the Plug-in Manager. |
License.lua |
The free trial and license key check before each run, and finding the Python the helper runs with. |
Profiles.lua, helper\profiles.py |
The named settings profiles (see Profiles), for the plug-in and for the app. |
helper\autocrop.py |
The helper program that looks at each photo and works out the crop. Lightroom runs it in the background. |
helper\autocrop_detect.py |
Finding the item, its edges, the angle and print borders; the batch check. |
helper\orient.py |
The orientation check (faces, scene, sky, horizon). |
helper\filmformat.py |
The film formats for negatives and slides (see Film format and Image format). |
helper\po_license.py |
Checks the license key and counts the free trial, on this computer (nothing is sent anywhere). Shared with the Spoolwell Video Finishing Toolbox. |
helper\app.py, helper\app_render.py, helper\app_ui.html, app-icon.ico, app-icon.icns |
The app: a small program that runs on this computer only and shows its page in your web browser; cutting out the crops and writing the new pictures and sidecars; the page itself; the app's icons. |
helper\update_apply.py |
Installs an update from inside Lightroom (Install now): checks the download and swaps the new files in, putting everything back if anything fails. |
helper\data |
Face-detection data from OpenCV and a small face-detection model from MediaPipe, used by the orientation check. |
python-win |
Windows download: Python and its image libraries for Windows. Nothing to install. |
python-mac |
Mac download: Python and its image libraries for Apple silicon Macs. Nothing to install. |
Uninstall Auto Crop.exe |
Windows, only when installed with the Setup program: removes the plug-in and the app (also in the Start menu). It is in the app's folder. |
third-party-source |
Source code of rawpy and LibRaw, and of libheif and libde265, which read HEIC photos: their licenses ask for it to be included. |
docs |
This guide (Markdown and HTML), and a one-page cheat sheet (HTML and PDF). |
README.txt, CHANGELOG.txt, LICENSE.txt, NOTICE.txt |
Quick start, version history, license, third-party notices. |
Keep the folder together. The plug-in looks for the helper and Python inside its own folder. The app is a copy of the same folder, installed separately.
Where things go: on Windows the app is in %LOCALAPPDATA%\Programs\ThePictureOrg\Squarewell, with a Squarewell folder in the Start menu holding the Squarewell app, Squarewell User Guide, Squarewell Cheat Sheet and Uninstall Squarewell. On a Mac the app is in Applications > ThePictureOrg (or a ThePictureOrg folder in the Applications folder in your home folder, if the main one can't be written). The plug-in goes into Lightroom's own plug-in folder (see Install). Your settings, profiles, license key and the app's logs (AutoCrop-app-log.txt and autocrop-log.txt) are in the PictureOrg folder: %LOCALAPPDATA%\PictureOrg on Windows, ~/Library/Application Support/PictureOrg on a Mac. The installers keep a log for support in ~/Library/Logs/PictureOrg/AutoCrop-install.log on a Mac.
Appendix: License and credits
© 2026 The Picture Org LLC · thepictureorg.com. Free 21-day trial, then a license key is needed (see License and free trial); not to modify or resell; see LICENSE.txt. Squarewell includes Python (PSF License), NumPy (BSD), OpenCV (Apache 2.0), rawpy (MIT), LibRaw (GNU LGPL 2.1), ONNX Runtime (MIT), PyYAML (MIT), RapidOCR and the PaddleOCR text models (Apache 2.0), and word lists made from wordfreq by Robyn Speer (CC BY-SA 4.0); see NOTICE.txt. Adobe and Lightroom are trademarks of Adobe Inc.; other names are trademarks of their owners.
This is the User Guide that comes with Squarewell, kept up to date with each release. Questions: info@thepictureorg.com · Squarewell home page · All the -well tools